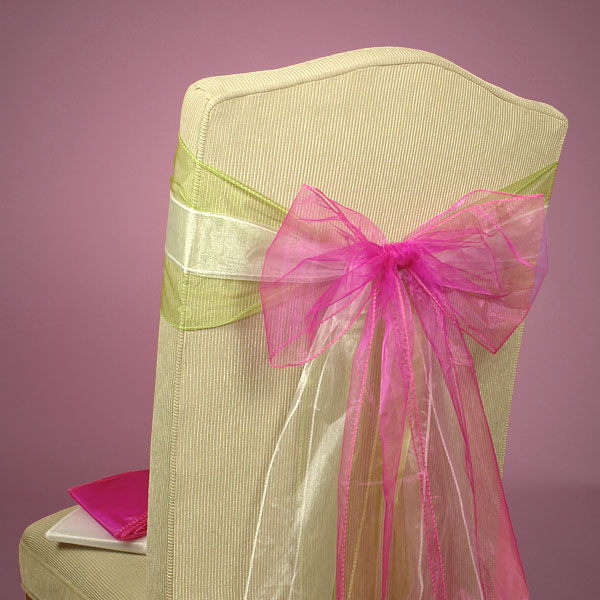
A simple way to add elegance to your wedding décor is to tie chair sashes onto the guest chairs for the ceremony or reception. This will add color and texture to your dull chairs, without breaking your wallet. Organza chair sashes, as well as burlap and satin chair sashes are very popular these days. To make your wedding chair sash, start off by cutting your choice of fabric to an appropriate length. Most chair sashes are about 6 to 8” in width and 7 feet long. Once you have the piece of fabric cut, locate the middle point of the sash. Wrap the chair with the fabric and make sure the middle point is pressing against the inside of the chair. Bring the tails of the sash around to the back side and tie a simple knot. Now it’s time to choose a style; there are three basic ways to tie your chair sash: basic bow, square knot or a flip knot.
Basic Bow
Once you have the simple knot tied, make two loops and tie them together. You can adjust the loops to desired length.
Square knot
Following the simple knot, tie another knot but flatten the top part of the knot before you tighten.
Flip Knot
After you have tied the simple knot, take the tails of the sash and loop them around the back so that they drape over your simple knot.
Wednesday, June 27, 2012
Tuesday, June 12, 2012
How to gift a wine bottle
A bottle of wine makes an elegant gift for a dinner party or as a housewarming gift. You can give the wine bottle alone or include it in a gift basket. Below are several ways you can gift a wine bottle to make it look fancy and elegant so that both its looks and taste are appreciated equally.
1. Tie a bow around the bottle of wine – Using satin or organza ribbon, tie a bow around the neck of the wine bottle. An elegant red bow can make a huge difference in the presentation of a simple wine bottle.
2. Use a wine bag – Place the wine bottle in a wine gift bag. There are numerous types of wine bags available in different fabrics including organza, velvet, satin and jute. Most of these bags come with draw strings that you pull tightly to secure the bottle in place. Organza wine bags have the advantage of allowing the person to see the wine bottle without taking it out of the bag.
3. Include it in a gift basket – Use a fabric covered basket and place the wine bottle in the middle. Include other goodies like cheese, crackers, and chocolate in the basket. Wrap it up with polypropylene sheet and use fabric ribbon to tie a beautiful bow.
1. Tie a bow around the bottle of wine – Using satin or organza ribbon, tie a bow around the neck of the wine bottle. An elegant red bow can make a huge difference in the presentation of a simple wine bottle.
2. Use a wine bag – Place the wine bottle in a wine gift bag. There are numerous types of wine bags available in different fabrics including organza, velvet, satin and jute. Most of these bags come with draw strings that you pull tightly to secure the bottle in place. Organza wine bags have the advantage of allowing the person to see the wine bottle without taking it out of the bag.
3. Include it in a gift basket – Use a fabric covered basket and place the wine bottle in the middle. Include other goodies like cheese, crackers, and chocolate in the basket. Wrap it up with polypropylene sheet and use fabric ribbon to tie a beautiful bow.
Wednesday, May 30, 2012
How to Make a 4th of July Ribbon Wand
Summer is nearly here and that means your kids will have plenty of free time to play outside, read books, and of course partake in crafts projects. The following is an activity easy enough for toddlers and elementary school aged children to do. Ribbon streamers are great for any festive event and will be especially useful at 4th of July parades and events.
For this project you will need the following materials:
• Paper towel roll tube
• Glue
• Scissors
• Hole puncher
• Ruler
• Roll of red and white candy striped ribbon
• Roll of red, white, and blue ribbon
Instructions
1. Start off by wrapping the striped ribbon around the paper towel tube. Use the glue to adhere the ribbon onto the roll.
2. Once the glue has dried completely, punch out 9 holes on the bottom of the paper towel tube using the hole puncher.
3. Cut three strips of red ribbon, blue ribbon and white ribbon that are each 45 inches long. You should have 9 ribbon pieces in total.
4. Tie a knot at the top of each of the ribbon pieces and pull each ribbon through the holes so that the knot is inside of the tube.
For this project you will need the following materials:
• Paper towel roll tube
• Glue
• Scissors
• Hole puncher
• Ruler
• Roll of red and white candy striped ribbon
• Roll of red, white, and blue ribbon
Instructions
1. Start off by wrapping the striped ribbon around the paper towel tube. Use the glue to adhere the ribbon onto the roll.
2. Once the glue has dried completely, punch out 9 holes on the bottom of the paper towel tube using the hole puncher.
3. Cut three strips of red ribbon, blue ribbon and white ribbon that are each 45 inches long. You should have 9 ribbon pieces in total.
4. Tie a knot at the top of each of the ribbon pieces and pull each ribbon through the holes so that the knot is inside of the tube.
Monday, May 14, 2012
Different types of take out boxes
When you think of take out boxes, an image of a plain white Chinese takeout box or foam clamshell box might come to mind. While a majority of restaurants do carry these types of take out boxes, that’s not to say those are the only types available. In fact, take out boxes come in numerous styles, patterns, and colors. Take for example, the polka dot printed boxes that are perfect not only for carrying food but for presenting favors as well. A friend of mine actually used these at her dinner party. She gave away desserts including brownies, cookies, and other treats packaged in a decorative take out box. Not only did this make it easier for guests to carry the treats home, they also appreciated the presentation and beauty of the polka dot take out box.
If patterned take out boxes don’t suit your style, you can always go with the traditional white or mono-colored boxes. Foam clamshell boxes often feature compartmentalized sections to separate different types of foods. One section can be used for the main entrée, the other for the side dish, and the third for an appetizer or dessert. Best of all, take out boxes come in many sizes to accommodate various types of foods.
Tuesday, May 1, 2012
Baskets for Organizing
Not only are baskets great for gift giving, they are also useful for organizing items around you house. Any room in your home can benefit from some great looking baskets. Recently, it has become a trend to decorate your house using these nifty organizers. If you have a furniture piece with cubicles, you can insert square baskets into the slots to organize household items.
Baskets are also great for organizing items in your children's rooms. Toys, books, art supplies, and other small items can be neatly tucked away in baskets for safe storing. They can be arranged in the room so that your child can easily reach for the items he or she wants, and then put them away later.
In addition to children's rooms, many people use baskets in their bathrooms to organize toiletries. They are fantastic for keeping your hairbrush, curling iron, straightner, and hair products organized in one place. Choose from oval, square, or rectangular baskets for decorating your home. Although traditional baskets are brown or beige, they can also be found in vibrant colors. For a child’s room, for example, you may want to accessorize with brightly colored baskets. Another option is to layer the inside of the basket with a patterned fabric to add a bit of flair and style to the traditional brown basket.
Paper Mart carries a great selection of woven baskets at wholesale prices that are sure to complement any room in your house.
Baskets are also great for organizing items in your children's rooms. Toys, books, art supplies, and other small items can be neatly tucked away in baskets for safe storing. They can be arranged in the room so that your child can easily reach for the items he or she wants, and then put them away later.
In addition to children's rooms, many people use baskets in their bathrooms to organize toiletries. They are fantastic for keeping your hairbrush, curling iron, straightner, and hair products organized in one place. Choose from oval, square, or rectangular baskets for decorating your home. Although traditional baskets are brown or beige, they can also be found in vibrant colors. For a child’s room, for example, you may want to accessorize with brightly colored baskets. Another option is to layer the inside of the basket with a patterned fabric to add a bit of flair and style to the traditional brown basket.
Paper Mart carries a great selection of woven baskets at wholesale prices that are sure to complement any room in your house.
Wednesday, April 25, 2012
Wedding Supplies
One of the most important days in a person’s life is their wedding day. A lot of time and money is spent to plan this festive event. Wedding supplies can range from being extravagant, costing thousands of dollars, to extremely simple and unique.
Some wedding supplies that are essential for this memorable day include guest books, ring pillows, flower baskets, and wedding favor boxes. To truly make your wedding unique, you should concentrate on the little details. For example, you can embellish the wedding favor boxes by tying a sheer or satin ribbon around them. If favor boxes are not your style, you can purchase organza, silk, or lace favor bags instead. Another idea is to decorate the flower basket yourself. You can use ribbons, artificial butterflies, tulle, and other crafts material to create a one-of-a-kind flower girl basket.
It is truly possible to find beautiful wedding supplies on a tight budget. Being creative is the key in these situations. By purchasing wedding supplies at wholesale prices and then embellishing them yourself, you can save a lot of money.
Some wedding supplies that are essential for this memorable day include guest books, ring pillows, flower baskets, and wedding favor boxes. To truly make your wedding unique, you should concentrate on the little details. For example, you can embellish the wedding favor boxes by tying a sheer or satin ribbon around them. If favor boxes are not your style, you can purchase organza, silk, or lace favor bags instead. Another idea is to decorate the flower basket yourself. You can use ribbons, artificial butterflies, tulle, and other crafts material to create a one-of-a-kind flower girl basket.
It is truly possible to find beautiful wedding supplies on a tight budget. Being creative is the key in these situations. By purchasing wedding supplies at wholesale prices and then embellishing them yourself, you can save a lot of money.
Wednesday, April 18, 2012
Making a bunny with plastic shopping bags
While plastic shopping bags may not seem like the best material for an arts and crafts project, they have several advantages that makes them so. First, plastic bags can be found easily; in fact, they are almost impossible to avoid. Second, they usually cost little or no money at all. Lastly, by using plastic bags for crafts project, you are essentially recycling them which is helpful for the environment.
The following is a tutorial on creating a bunny using a plastic grocery bag. This is a great activity do with your kids during Easter. Since it is fairly easy to do and only takes few minutes, you can get young kids (toddler age) to do them as well. The final product looks very cute and you can put these bunnies around the house as decoration.
Materials:
A plastic bag with handles (preferably a t shirt bag)
Filler – you can use shredded paper or cotton
2 rubber bands
Sharpie marker
Instructions:
1. Stuff the plastic bag with the filler
2. Tie a knot at the top of the bag with the handles. These should make your bunny ears.
3. Tie a rubber band around the bottom of the plastic bag to make the tail.
4. Using the sharpie marker, draw facial features like the bunny’s eyes, nose and mouth.
5. You should now have your bunny!
The following is a tutorial on creating a bunny using a plastic grocery bag. This is a great activity do with your kids during Easter. Since it is fairly easy to do and only takes few minutes, you can get young kids (toddler age) to do them as well. The final product looks very cute and you can put these bunnies around the house as decoration.
Materials:
A plastic bag with handles (preferably a t shirt bag)
Filler – you can use shredded paper or cotton
2 rubber bands
Sharpie marker
Instructions:
1. Stuff the plastic bag with the filler
2. Tie a knot at the top of the bag with the handles. These should make your bunny ears.
3. Tie a rubber band around the bottom of the plastic bag to make the tail.
4. Using the sharpie marker, draw facial features like the bunny’s eyes, nose and mouth.
5. You should now have your bunny!
Subscribe to:
Posts (Atom)


